✓ Building your own gaming PC can save you hundreds, even thousands, of dollars compared to pre-built systems.
✓ Customizing your PC allows for tailored performance, aesthetics, and future upgradeability.
✓ No prior technical expertise is required; this guide breaks down every step into digestible actions.
✓ Understanding each component's role empowers you to troubleshoot and upgrade your system confidently.
How It Works
1
Gather Your Components & Tools
Before you begin, ensure all your chosen parts are present and accounted for. You'll also need basic tools like screwdrivers and zip ties.
2
Assemble Core Components
This involves installing the CPU, CPU cooler, RAM, and M.2 SSD onto the motherboard outside the case for easier handling.
3
Mount Motherboard & Power Supply
Carefully place the assembled motherboard into the PC case, securing it with standoffs and screws. Then, install the power supply unit.
4
Connect Peripherals & Cable Manage
Install the graphics card, connect all necessary power and data cables, and meticulously manage them for optimal airflow and aesthetics.
Understanding Your Gaming PC Components
Photo: Pok Rie / Pexels
Embarking on the journey of how to build a gaming PC step by step begins with a foundational understanding of its core components. Each part plays a crucial role in your system's overall performance, and knowing what they do will empower you to make informed decisions, both during the build and for future upgrades.
First, let's talk about the **Central Processing Unit (CPU)**, often called the 'brain' of your computer. It executes instructions, performs calculations, and manages the flow of information. For gaming, you'll want a CPU with a good balance of core count and clock speed. Intel's i5 and i7 series or AMD's Ryzen 5 and Ryzen 7 series are popular choices, offering excellent performance for modern games. The CPU's socket type (e.g., LGA 1700 for Intel, AM5 for AMD) dictates which motherboards it's compatible with, so ensure these match.
Next, the **Graphics Processing Unit (GPU)**, or graphics card, is arguably the most critical component for gaming performance. It renders images, videos, and animations, translating data into what you see on your screen. The more powerful your GPU, the higher resolutions and frame rates you can achieve in games. NVIDIA's GeForce RTX series and AMD's Radeon RX series dominate this market, with models ranging from budget-friendly to high-end powerhouses. Your choice here will significantly impact your gaming experience, so allocate a substantial portion of your budget to this component.
The **Motherboard** acts as the central nervous system, connecting all your components and allowing them to communicate. It houses the CPU socket, RAM slots, PCIe slots for your GPU and other expansion cards, and various ports for storage and peripherals. Compatibility is key here; ensure it supports your chosen CPU, RAM type (DDR4 or DDR5), and has enough slots for your needs. Chipset features also vary, affecting connectivity options and overclocking potential.
**Random Access Memory (RAM)** is your system's short-term memory. It stores data that the CPU needs to access quickly. For gaming, 16GB is generally the sweet spot, providing ample memory for most modern titles and multitasking. While 32GB offers more headroom, it's often overkill unless you're also doing heavy video editing or 3D rendering. Look for RAM with higher clock speeds (measured in MHz) and lower CAS latency for better performance. Understanding RAM speeds can significantly impact your build's efficiency.
**Storage** comes in two primary forms: Hard Disk Drives (HDDs) and Solid State Drives (SSDs). HDDs offer large capacities at a lower cost but are slower. SSDs, especially NVMe M.2 SSDs, are significantly faster, leading to quicker boot times, faster game loading, and snappier overall system responsiveness. For a gaming PC, an NVMe SSD for your operating system and primary games is highly recommended, with an optional larger HDD for mass storage if needed.
Finally, the **Power Supply Unit (PSU)** delivers electricity to all your components. It's crucial to choose a PSU with sufficient wattage to power your entire system, especially your GPU, and one with a good efficiency rating (e.g., 80 Plus Bronze, Gold, Platinum). Don't skimp on the PSU; a cheap, unreliable unit can damage other components. Use online PSU calculators to estimate your system's power requirements. Understanding these components is the first critical step in confidently learning how to build a gaming PC step by step.
Pre-Assembly: Preparing Your Workspace and Components
Before you even think about putting parts together, proper preparation is paramount when learning how to build a gaming PC step by step. A well-organized workspace and carefully prepared components will prevent frustration, potential damage, and ensure a smooth assembly process.
**1. Clear and Clean Your Workspace:** Find a large, flat, and well-lit area. A dining table or a sturdy desk works perfectly. Ensure the surface is clean and free of clutter. Avoid working on carpeted floors, as static electricity is your enemy. If you must work on carpet, use an anti-static mat.
**2. Gather Your Tools:** You won't need many specialized tools. A Phillips head screwdriver (magnetic tip is a bonus), zip ties or Velcro straps for cable management, and possibly a pair of small snips for cutting zip ties are usually sufficient. An anti-static wrist strap is highly recommended to protect sensitive components from electrostatic discharge (ESD). Attach it to an unpainted metal part of your PC case or PSU once they are out of their boxes and grounded.
**3. Unbox and Inspect Components:** Carefully unbox each component. Check for any visible damage, bent pins on the CPU, or missing accessories. It's much easier to return a damaged part before you've tried to install it. Keep all original packaging, manuals, and driver CDs/USB drives in a safe place. These will be useful for troubleshooting or returns.
**4. Read Your Manuals:** Yes, really! While this guide provides general instructions on how to build a gaming PC step by step, each motherboard, CPU cooler, and case has specific nuances. The manuals will provide precise details on screw types, header locations, and installation methods unique to your particular models. Skimming through them now can save you headaches later.
**5. Organize Screws and Accessories:** PC components come with a bewildering array of screws, standoffs, and cables. As you unbox, try to keep these organized. Many cases come with a small box or bag for screws; utilize it. Knowing which screw goes where will speed up the assembly process significantly.
**6. Static Electricity Precautions:** Static electricity can permanently damage your components. Besides an anti-static wrist strap, frequently touch an unpainted metal part of your PC case (once it's out of the box) to discharge any static buildup. Avoid wearing wool socks or shuffling your feet on carpet. Handle components by their edges, minimizing contact with exposed circuitry.
By taking these preparatory steps, you're not just being cautious; you're setting yourself up for success. A calm, organized approach to pre-assembly will make the actual building process of how to build a gaming PC step by step far more enjoyable and less intimidating. This meticulous preparation is a hallmark of experienced builders and will serve you well as you proceed with your build.
The Core Assembly: CPU, Cooler, RAM, and Motherboard
This is where the magic truly begins as you start piecing together the heart of your system. Learning how to build a gaming PC step by step involves careful, precise installation of these core components onto the motherboard before it goes into the case. This 'out-of-case' assembly makes the process much more accessible.
**1. Installing the CPU:** Start by gently opening the CPU retention arm and lifting the metal load plate on the motherboard's CPU socket. Carefully align the CPU with the socket, paying close attention to the gold triangle or notch on the CPU and the corresponding marker on the socket. Do NOT force the CPU into place; it should drop in with minimal pressure. If it doesn't, recheck alignment. Once seated, close the load plate and secure it with the retention arm. You might feel some resistance, which is normal. Avoid touching the pins on the CPU or in the socket.
**2. Installing the CPU Cooler:** If your CPU came with a stock cooler, follow its instructions. For aftermarket coolers, first apply thermal paste (if not pre-applied) to the center of the CPU. A pea-sized dot is usually sufficient. Then, carefully align the cooler with the mounting holes on the motherboard and secure it according to the cooler's instructions. This often involves backplates and specific screw patterns. Ensure it's firmly attached but don't overtighten. Connect the CPU cooler's fan cable to the 'CPU_FAN' header on the motherboard. This is a critical step; your system won't boot without it, or it will shut down quickly to prevent overheating. Choosing the right CPU cooler is vital for performance and longevity.
**3. Installing the RAM (Memory):** Locate the RAM slots on your motherboard. They are usually next to the CPU socket. Open the clips on both ends of the RAM slot. Align the notch on the RAM stick with the notch in the slot. Apply even pressure to both ends of the RAM stick until the clips snap into place, indicating it's fully seated. If you're installing two sticks, refer to your motherboard manual for the correct slots for dual-channel operation (often slots 2 and 4, or 1 and 3, counting from the CPU). This optimizes memory performance.
**4. Installing the M.2 SSD (if applicable):** If you have an NVMe M.2 SSD, locate the M.2 slot(s) on your motherboard. Remove the small screw and standoff from the slot. Insert the M.2 drive at an angle into the slot, then gently push it down until it's flat. Secure it with the screw you removed earlier. Some motherboards come with M.2 heatsinks; if so, install that over the drive according to your motherboard's instructions.
With these critical components now assembled onto your motherboard, you've completed the most delicate part of the build. You're well on your way to mastering how to build a gaming PC step by step, and the remaining steps will feel much more straightforward. Take a moment to double-check all connections and ensure everything is firmly seated before moving on to the case installation.
Finalizing Your Build: Graphics Card, Cables, and First Boot
You're in the home stretch of learning how to build a gaming PC step by step! This section covers installing the graphics card, connecting all the necessary cables, and the exhilarating moment of the first boot. Precision and patience are key here.
**1. Installing the Graphics Card (GPU):** Locate the primary PCIe x16 slot on your motherboard (it's usually the top-most, reinforced slot). Remove the corresponding PCIe slot covers from the back of your PC case. Open the small retention clip at the end of the PCIe slot. Carefully align your graphics card with the slot and push it down firmly until it clicks into place and the retention clip closes. Secure the GPU to the case with screws. Connect the appropriate PCIe power cables from your PSU to the graphics card. Some high-end GPUs require two or even three separate power cables.
**2. Installing Storage Drives (HDDs/SATA SSDs):** If you have traditional 2.5-inch SATA SSDs or 3.5-inch HDDs, install them into the drive bays of your case. These bays often use tool-less designs or require screws. Once secured, connect a SATA data cable from the drive to a SATA port on your motherboard, and a SATA power cable from your PSU to the drive.
**3. Connecting Front Panel Headers:** This is often considered the most fiddly part. Locate the small pins at the bottom edge of your motherboard. These are for your case's front panel connectors: Power Switch, Reset Switch, Power LED, HDD LED, and USB/Audio headers. Refer *very carefully* to your motherboard manual for the correct orientation and placement of each tiny connector. Incorrectly connecting these won't damage anything, but your power button might not work.
**4. Cable Management:** This step is crucial for good airflow and aesthetics. Route all your cables – power, data, and front panel – through the cutouts in your case's motherboard tray to the back side. Use zip ties or Velcro straps to bundle and secure cables, keeping them tidy and out of the way of fans. A clean cable management job makes your PC look professional and improves cooling.
**5. Double-Check All Connections:** Before closing the case, take a moment to meticulously review every connection. Are all power cables (24-pin ATX, 8-pin CPU, PCIe) firmly seated? Is the CPU fan connected? Are all RAM sticks properly clipped in? Are the front panel headers correct? This quick check can save you troubleshooting time later.
**6. The First Boot:** Connect your monitor, keyboard, and mouse. Plug in the power cable to the PSU and flip the PSU's power switch to 'on'. Press the power button on your case. If all goes well, your fans will spin, lights will illuminate, and you'll see a signal on your monitor, likely taking you to the BIOS/UEFI screen. If nothing happens, don't panic! Review your power connections, especially the front panel headers. If you get a signal but no operating system, that's normal – you'll install Windows or Linux next. Congratulations, you've successfully learned how to build a gaming PC step by step!
Comparison
Component
Best Option for Gaming
Mid-Range Gaming
Budget Gaming
CPU
Intel i7/i9 or Ryzen 7/9
Intel i5 or Ryzen 5
Intel i3 or Ryzen 3
GPU
NVIDIA RTX 4080/4090 or AMD RX 7900 XTX
NVIDIA RTX 4060/4070 or AMD RX 7700/7800 XT
NVIDIA RTX 3050/4050 or AMD RX 6600
RAM
32GB DDR5 @ 6000MHz+
16GB DDR4 @ 3200MHz or DDR5 @ 5200MHz
16GB DDR4 @ 3000MHz
Storage
2TB NVMe SSD
1TB NVMe SSD
500GB NVMe SSD + 1TB HDD
PSU (Wattage)
850W+ Gold Rated
650W-750W Gold Rated
550W-650W Bronze Rated
Motherboard
High-end Z/X series
Mid-range B series
Entry-level H/A series
What Readers Say
★★★★★
"This guide on how to build a gaming PC step by step was incredibly detailed and easy to follow. I saved over $500 compared to buying a pre-built, and my new rig runs all my games flawlessly. Highly recommend for any first-time builder!"
Alex P. · Austin, TX
★★★★★
"I was intimidated by PC building, but this article broke it down perfectly. The component explanations were clear, and the step-by-step instructions made me feel confident. My custom PC is a beast!"
Sarah L. · Seattle, WA
★★★★★
"Following this guide, I built my first gaming PC in an afternoon. The first boot was a success, and I'm now enjoying 1440p gaming at high refresh rates. The cable management tips were particularly helpful for a clean look."
David M. · Miami, FL
★★★★★
"The guide was mostly excellent, though I wish there were a few more specific brand recommendations for budget options. Still, I managed to build a great PC, and the troubleshooting section was a lifesaver when my front panel didn't light up initially."
Jessica R. · Denver, CO
★★★★★
"As someone who'd only ever used laptops, learning how to build a gaming PC step by step felt like a huge leap. This article demystified the entire process. My son and I built his dream PC together, and the experience was priceless."
Mark T. · Chicago, IL
Frequently Asked Questions
Is it really cheaper to build a gaming PC than to buy a pre-built one?
Generally, yes. Building your own PC allows you to source components at the best prices, avoid assembly fees, and choose exactly what you need without paying for unnecessary extras. While some sales on pre-builts can be competitive, building almost always offers better value for performance.
What if I make a mistake and break a component?
While component damage is a concern, it's less common than you might think if you follow instructions carefully and take anti-static precautions. Most components come with warranties, and many retailers offer return policies. The most common 'mistakes' are usually minor, like loose cables, which are easily fixed.
How do I install the operating system after building the PC?
After your first successful boot to the BIOS, you'll need a USB drive with the operating system (like Windows 10/11 or a Linux distribution) installation media. You'll boot from this USB drive, follow the on-screen prompts to partition your SSD, and install the OS. Drivers for your components will then need to be installed, usually from the manufacturer's websites.
How much should I budget for a decent gaming PC?
A decent entry-level gaming PC capable of 1080p gaming can start around $700-$900. Mid-range systems for 1440p gaming typically fall into the $1200-$1800 range. High-end 4K gaming rigs can easily exceed $2000-$3000+. Your budget largely dictates the level of performance you can achieve.
Is building a gaming PC difficult for a beginner?
Not with the right guidance! While it may seem daunting, building a PC is often described as 'adult LEGOs.' It requires patience and attention to detail, but not advanced technical skills. This step-by-step guide is designed to make the process accessible and enjoyable for first-timers.
Who should consider building their own gaming PC?
Anyone looking for maximum performance for their money, who enjoys customizing their setup, wants to understand their hardware better, or simply enjoys a rewarding DIY project. It's perfect for gamers, content creators, and tech enthusiasts alike.
What are the biggest risks when building a PC?
The primary risks are electrostatic discharge (ESD) damaging components, incorrect installation leading to non-booting systems, or physical damage from mishandling. Using an anti-static wrist strap, handling components carefully, and double-checking connections mitigate most of these risks.
How will PC building evolve in the next few years?
We can expect continued advancements in component efficiency, smaller form factors, and more integrated solutions. AI acceleration in GPUs will become even more prevalent, and modularity might increase. The core principles of how to build a gaming PC step by step, however, are likely to remain consistent.
Ready to take control of your gaming experience? By following this comprehensive guide on how to build a gaming PC step by step, you're not just assembling hardware; you're crafting a personalized, high-performance machine tailored to your exact needs. Dive in, enjoy the process, and elevate your gaming to the next level!

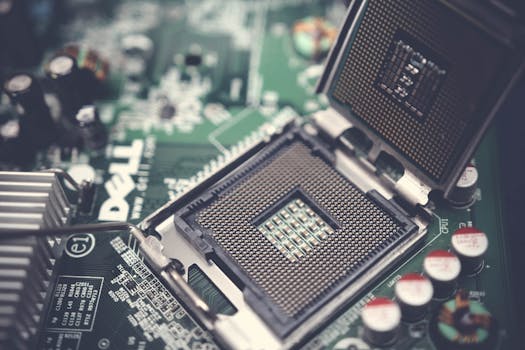 Photo: Pok Rie / Pexels